

How To Disassemble & Clean The Euro Chopper
I am a calculator engineer in Bharat with a special interest in computer programming.
This process is a office of estimator maintenance.
Epitome via Canva
A Footstep-by-Step Guide to Personal Estimator Disassembly and Assembly
In this article, nosotros'll learn:
- The Parts of a Estimator
- How to Disassemble a Computer
- How to Assemble a Computer
Parts of Computer System
The computer organization is fabricated up of following external devices:
- CPU cabinet
- Monitor
- Keyboard
- Mouse
- Printer/scanner (if attached)
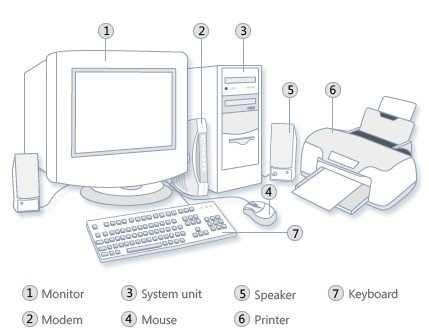
Estimator Organisation
windows.microsoft.com
How to Disassemble a Computer
Follow these seven steps carefully.
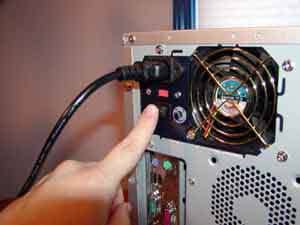
Footstep 1: Detach the Power Cable
The disassembling of the computer system starts with externally connected device detachment. Brand sure the figurer organisation is turned off, if not then successfully close down the system then get-go detaching the external devices from the computer system. Information technology includes removing the power cable from electricity switchboard, then remove the cable from SMPS (switch fashion power supply) from the back of the CPU Cabinet. Do non start the disassembling without detaching the power cable from the computer system. Now remove the remaining external devices similar keyboard, mouse, monitor, printer or scanner from the back of CPU chiffonier.
Step 2: Remove the Encompass
The standard fashion of removing belfry cases used to be to undo the screws on the back of the case, slide the cover dorsum almost an inch and elevator it off. The screwdrivers equally per the blazon of spiral are required to do the task.
Step 3: Remove the Adapter Cards
Make certain if the menu has any cables or wires that might exist attached and decide if it would be easier to remove them before or subsequently you remove the card. Remove the spiral if whatsoever, that holds the bill of fare in identify. Grab the carte du jour by its edges, front and back, and gently rock it lengthwise to release information technology.
Step 4: Remove the Drives
Removing drives is easier. There tin can exist possibly three types of drives present in your computer system, Hard disk drive, CD/DVD/Blu-ray drives, floppy disk drives (almost accented now a day). They commonly accept a power connector and a data cablevision attached from the device to a controller menu or a connector on the motherboard. CD/DVD/Blu-ray drive may have an analog cable continued to the sound carte du jour for direct audio output.
The power may be attached using one of two connectors, a Molex connector or a Berg connector for the drive. The Molex connector may require to exist wiggled slightly from side to side and employ gentle pressure outwards. The Berg connector may just pull out or it may have a small tab which has to be lifted with a screwdriver.
At present pull data cables off from the drive every bit well every bit motherboard connector. The hard disk and CD/DVD drives have 2 types of information cables. IDE and SATA cables. The IDE cables need amend care while beingness removed equally information technology may cause the damage to drive connector pins. Gently wiggle the cable sideways and remove it. The SATA cables can be removed easily past pressing the tab and pulling the connector straight dorsum.
Now remove the screws and slide the bulldoze out the back of the bay.
Step five: Remove the Retentivity Module
Retentiveness modules are mounted on the motherboard as the chips that can be damaged by manual forcefulness if practical improperly. Exist careful and handle the fleck only past the edges. SIMMs and DIMMs are removed in a different way:
- SIMM - Gently button back the metal tabs while belongings the SIMM chips in the socket. Tilt the SIMM chip abroad from the tabs until a 45% angle. It will now elevator out of the socket. Put SIMM in a condom place.
- DIMM - There are plastic tabs on the end of the DIMM sockets. Press the tabs downwardly and away from the socket. The DIMM will elevator slightly. Now take hold of information technology by the edges and place it safely. Practise non allow the chips get grit at all.
Step 6: Remove the Power Supply
The power supply is attached into tower chiffonier at the superlative dorsum end of the tower. Brand sure the power connector is detached from the switchboard. First removing the power connector continued to motherboard including CPU fan ability connector, cabinet fan, the front console of cabinet power buttons and all the remaining drives if non detached even so.
Now remove the screws of SMPS from the back of the cabinet and the SMPS tin be detached from the tower cabinet.
Step 7: Remove the Motherboard
Before removing all the connectors from the motherboard, make certain you memorize the connectors for assembling the computer if required, every bit that may require connecting the connectors at its place. Remove the screws from the back of the motherboard and you will exist able to detach it from the cabinet. Now remove the CPU fan from the motherboard. The estrus sink will be visible now which can be removed by the pulling the tab upwardly. Finally, the processor is visible now, which can exist removed by the plastic tab which tin be pulled dorsum one stretching it side manner.
How to Assemble a Computer
The assembling of the figurer organisation is exactly the opposite of disassembling operation. Before starting assembling the computer organisation, brand certain you have the screws and a screwdriver for those.
Step one: Mountain the Processor
The first step for assembling the calculator system starts with mounting the processor on the processor socket of the motherboard. To mount the procedure, y'all don't need to utilise any strength. The special ZIF (zero insertion forcefulness) sockets are usually used to preclude any damage to the processor pins. Once the processor is mounted, the heat sink volition be fastened on top of the processor. The CPU fan is as well attached on top of the heat sink.
Stride 2: Fix the Motherboard in the Belfry Case
At present the motherboard is to be fixed vertically in the belfry case and the screws are fixed from backside of the motherboard.
Pace 3: Connect the Ability Supply
Now line upwardly the power supply at the tiptop back end of the cabinet and screw it. The power connectors for motherboard ability supply and CPU fan power supply are to exist continued. If the cabinet cooling FAN is required then it is to be screwed at the back finish grill of the cabinet and its power connector is to be connected from SMPS.
Step 4: Install the Drives
Install the CD/DVD drives at the top forepart of the chiffonier and spiral it. Install the Hard disk and floppy disk bulldoze below CD/DVD drive and screw it. Make certain once screwed there is no vibration in either of the CD/DVD, hard disk drive or floppy disk drives.
Stride 5: Connect Cables
Now select the appropriate data cablevision and connect one cease of the cable to its bulldoze socket and some other end at its advisable connector on the motherboard. For SATA hard disk or CD/DVD drives utilise SATA cable and its power cablevision, else use IDE data cablevision. Exercise the proper jumper settings as per the usage requirement.
Step half dozen: Mountain the Memory Modules
It is time now to mount the retention modules on the motherboard past aligning the RAM to its socket on the motherboard and press information technology down. Make sure the side tab are fixed into the RAM notch. If not, you lot may still have to printing a bit.
Pace 7: Install the Internal Cards
Install the internal cards to its socket and attach the cables or power cable to it. The selection of right socket or slot is required equally per the type of socket.
Footstep 8: Cover the Belfry
Comprehend the tower by placing it and pressing towards front side and screw it.
Step 9: Connect the External Devices and Power
Connect the external devices with CPU at its advisable socket. It includes mouse and keyboard at PS2 or USB connectors. Monitor at the video output socket. Connect the power cable to the dorsum of tower in SMPS. Plug in the power cablevision to the electric board.
This article is accurate and true to the best of the author's knowledge. Content is for informational or entertainment purposes simply and does not substitute for personal counsel or professional person advice in business, fiscal, legal, or technical matters.
Questions & Answers
Question: What is a computer?
Reply: A estimator is a slice of electronic equipment that generates the outcome based on the logic, as per the input is given past the user.
Question: What factors should be considered before disassembly and reassembly of a calculator?
Answer: The following factors are to be considered before disassembly and reassembly.
one) Shut down the computer organization before the get-go of the process. Information technology is hazardous to perform any such activity with the estimator system power on and connected with the power supply. Detach the power cable .
2) Remove all the interfaces of the devices connected with the cabinet(computer organization).
three) Perform the task at the dry, not humid expanse to prevent environmental problem.
four) If you are inexperienced, have a picture of the inside assembly of the chiffonier, then that y'all can attach the right thing at the right identify at the time of reassembly.
v) Keep all the screw properly and gear up all of them at the appropriate place
Question: What make of computer did yous get together and disassemble?
Answer: All the brands with desktop system are mostly similar for assembling and disassembling. You lot but detach the external peripherals like monitor, keyboard, mouse, speaker etc and detach the power cable. Unscrew the chiffonier and the disassembling of the estimator begins similar this.
Question: What tools are needed in assembling and disassembling a computer?
Answer: You need a screwdriver, cotton cloth, and blower.
CATHY on July 23, 2022:
Outline how to disconnect a estimator components
marian on March 18, 2022:
What have you learn on assemble and disassemble the pc?
Black CHILD SA on March 06, 2022:
Thank you
pm on Feb 20, 2022:
cheers ihv benefited a lot
carlos jojo(yabesse) on February 12, 2022:
cheers for this passage I larn more
Thylane Elizabeth F. Ruelo on February 09, 2022:
Thank you for your quick response
I larn a lot
PRITAM KR on September 02, 2022:
Thank you u for this page
GINA LANG MALAKAS on June thirty, 2022:
hakdog
E.Madhumitha on June 29, 2022:
I don't have whatever satisfaction in this thing
paras joshi (author) from rajkot, india on June 26, 2022:
Thanks very much
abhsihek on January 28, 2022:
cutie
aries bakulaw on January 27, 2022:
i desire to install new ram i turnned off my pc,took out the power cable,opened the pc,looseened the 2gb
mavin alexa on January 24, 2022:
it is good
Cj on Oct 01, 2022:
I desire to install my new ram I turned off my PC, took out the power cable, opened the PC, loosened the 2GB of ram, took them out, put in the new 4GB ram, tightened it, put on my PC, plugged it in... And my monitors turned on, yet it shows my processor unganged mode information technology detect my HDD but the cmos shows that it is checksum bad. Besides, my keyboard is turning on but when I click the f1 or whatsoever keys after 5 or 6 click the keyboard will turned off? I experimented by either putting in my old ram or simply using one slot of ram, yet it is e'er the same ending. Might I have damaged my motherboard or ram slots or what tin can I practice to fix it?
Priya on September 28, 2022:
And so dainty
luluwilson on September 24, 2022:
you degenerate troglodytes
jhasneyvisitacion on September 08, 2022:
hahahahha
Dalumpines on August 15, 2022:
ctrl c, ctrl v
jasper on August 14, 2022:
im then lucky to see this site
mocha uson on August 09, 2022:
alabyu tulongg
Tulong on August 09, 2022:
MGA ADOBO
mocha uson on Baronial 09, 2022:
so weeeiirrrddd
principaloffice on August 09, 2022:
nasa bakasyon ako ngayon
babala bala kayo dyan magalala na kau
principaloffice on August 09, 2022:
agik kayo
Duterte on August 09, 2022:
hahakdog
Duterte on August 09, 2022:
pe pe de de ralismo
mocha uson on August 09, 2022:
lord's day darating ang mga salitaaa
Duterte on August 09, 2022:
gago
pokwang 26 on August 09, 2022:
nakakabusit mukha mo
Duterte on August 09, 2022:
millet get ako 1k
Duterte on Baronial 09, 2022:
file:///C:/LanSchool%20Files/pc%20builder/en_ITEPC_VA_Desktop_v40/Index.html
gloria arroyo on August 09, 2022:
WALA NA FINISH NA!!!!!!
Tulong on August 09, 2022:
Patulong, napaihi ako sa girlfriend ka habang nag sastyle-dog kmi
alasingko on August 09, 2022:
hatdog
Duterte on Baronial 09, 2022:
millet
mocha uson on August 09, 2022:
mga adobo!
gloria approach on August 09, 2022:
PINDUTIN NIYO KAMUKA NIYO SIYA https://world wide web.google.com.ph/imgres?imgurl=http%3A%2F...
pokwang 26 on August 09, 2022:
pogi ni ezekiel mukhang pwit
gloria approach on Baronial 09, 2022:
PINDUTIN NIYO GUYS https://www.google.com.ph/imgres?imgurl=https%3A%ii...
gloria arroyo on Baronial 09, 2022:
BAT KAILANGAN PA PAGARALAN TO?!!!!
gloria arroyo on August 09, 2022:
WAG KANG PABIBO MAGIC12
magic12 on August 09, 2022:
makinig kayo BOYS
magic12 on August 09, 2022:
oo nga!
gloria arroyo on August 09, 2022:
Mag ARAL MABUTI GUYS!!
gloria arroyo on August 09, 2022:
Assembling the computer arrangement
The assembling of the computer system is exactly the opposite of disassembling operation. Before starting assembling the computer system, make sure you have the screws and a screwdriver for those.
The commencement step for assembling the computer organisation starts with mounting the processor on the processor socket of the motherboard. To mountain the process, you don't need to employ whatsoever force. The special ZIF (zero insertion force) sockets are commonly used to prevent any damage to the processor pins. One time the processor is mounted, the heat sink will be fastened on top of the processor. The CPU fan is also attached on tiptop of the heat sink.
Now the motherboard is to be fixed vertically in the belfry instance and the screws are stock-still from behind of the motherboard.
At present line up the power supply at the height dorsum cease of the chiffonier and screw it. The ability connectors for motherboard ability supply and CPU fan power supply are to be connected. If the cabinet cooling FAN is required then it is to exist screwed at the dorsum cease grill of the chiffonier and its power connector is to be continued from SMPS.
Install the CD/DVD drives at the top front end of the chiffonier and screw it. Install the Hard disk bulldoze and floppy deejay drive beneath CD/DVD drive and spiral it. Brand certain once screwed there is no vibration in either of the CD/DVD, Hard disk drive or Floppy disk drives.
Now select the advisable data cablevision and connect one end of the cable to its drive socket and another end at its advisable connector on the motherboard. For SATA hd drive or CD/DVD drives use SATA cablevision and its ability cablevision, else employ IDE data cablevision. Practise the proper jumper settings as per the usage requirement.
It is time now to mount the memory modules on the motherboard by aligning the RAM to its socket on the motherboard and press information technology down. Make sure the side tab are fixed into the RAM notch. If not, y'all may still have to press a fleck.
Install the internal cards to its socket and attach the cables or power cable to it. The selection of right socket or slot is required equally per the type of socket.
Encompass the tower by placing it and pressing towards front end side and screw it.
Connect the external devices with CPU at its appropriate socket. It includes mouse and keyboard at PS2 or USB connectors. Monitor at the video output socket. Connect the power cablevision to the back of tower in SMPS. Plug in the power cable to the electric board.
magic12 on August 09, 2022:
millet tignan mo si salvador
gloria arroyo on August 09, 2022:
JABAR
magic12 on August 09, 2022:
ano gawa mu salvador
pokwang 26 on August 09, 2022:
vetch
gloria arroyo on August 09, 2022:
MILYON PANS AROUND THE Earth!!!
gloria arroyo on August 09, 2022:
ARE You lot Ready!!!!!! ARE YOU Set up!!!!
Duterte on August 09, 2022:
pindutinv niyo link https://www.youtube.com/channel/UCBu7cA-svCJ1EscP8...
gloria arroyo on Baronial 09, 2022:
kamukha niyo yung etits ko
gloria arroyo on August 09, 2022:
ang lakas ni kurtt
Tulong on August 09, 2022:
Ability RANGER
Duterte on August 09, 2022:
https://www.youtube.com/channel/UCBu7cA-svCJ1EscP8...
pokwang 26 on August 09, 2022:
love you all
Duterte on Baronial 09, 2022:
english mst ba?
ejot on August 09, 2022:
wakanda poreber es
gloria arroyo on Baronial 09, 2022:
alam mo u better become out!!!!
ejot on August 09, 2022:
mahal kita mandac
mocha uson on Baronial 09, 2022:
samahan nyo komagbilang ng mga bata
Duterte on August 09, 2022:
tara na tayo ay magsama sama tayo ay magkaisa
gloria arroyo on August 09, 2022:
samahan niyo ako magbilang ng tao sa tarlac
Duterte on August 09, 2022:
gloria get ako 1k
Sir roy on August 09, 2022:
guys lecture na kayoo!!
mocha uson on August 09, 2022:
hi mga bata
magic12 on August 09, 2022:
anu gawa niyu
alasingko on August 09, 2022:
fourth dimension bank check one:30pm
bukellllllll on August 09, 2022:
beautiful ni lorenzoooooooo
gloria arroyo on August 09, 2022:
ustuuuu nsaaaaaaaa
Duterte on August 09, 2022:
yie parang tanga
mocha uson on August 09, 2022:
hello mga tanga
gloria approach on August 09, 2022:
mahal kita atty gadon labyu
Duterte on Baronial 09, 2022:
gloria at gadon hi
gloria arroyo on August 09, 2022:
hikaw bobo atty gadon
magic12 on August 09, 2022:
salvador nu gawa mu
Duterte on August 09, 2022:
ikaw ang bobo
secretttt 2 on Baronial 09, 2022:
i dear y'all talavera
alasais on August 09, 2022:
millet
alasingko on Baronial 09, 2022:
tibo ako hehe
secretttt 2 on August 09, 2022:
wag ka maingay inigo
alasingko on Baronial 09, 2022:
diko kayo bati
secretttt two on August 09, 2022:
manacup hellooooooo
alasingko on August 09, 2022:
penge oil sheet millet
alasingko on August 09, 2022:
ok boys si sir magtoto to
secretttt 2 on August 09, 2022:
millet kapangit mooooooo
alasingko on August 09, 2022:
kasi naka bukas naman pintuan e
alasingko on August 09, 2022:
alam mo you better go out
PEPITO on August 09, 2022:
Like
alasingko on Baronial 09, 2022:
lakajan bandala
alasingko on August 09, 2022:
castrong talaga
alasingko on August 09, 2022:
alasingko nanaman\
nanay mo on August 09, 2022:
good.
lolo mo on Baronial 09, 2022:
ty ty ty
anonymous on July 29, 2022:
highly hypothertical
madhumadhavakumar on July 29, 2022:
nothing is impossible everything is possible
RJ..AJ.. on July 26, 2022:
I tin can't empathize
Ismail on July 24, 2022:
information technology was grt to learn from here.than
oliver ramos on July 18, 2022:
tank you for information

Source: https://turbofuture.com/computers/Dissassembling-and-Assembling-the-computer-system
Posted by: newtonturatillad1935.blogspot.com
0 Response to "How To Disassemble & Clean The Euro Chopper"
Post a Comment